1. Phần HTML
Trước hết hãy xem qua toàn bộ mã nguồn:
|
1
2
3
4
5
6
7
8
9
10
11
12
13
14
15
16
17
18
19
20
21
|
<body> <div class="parallax"> <div class="side-menu"> <ul> <li class="forest" onclick="moveToImage('.forest')" >Forest</li> <li class="eagle" onclick="moveToImage('.eagle')" >Eagle</li> <li class="rhino" onclick="moveToImage('.rhino')" >Rhino</li> <li class="owl" onclick="moveToImage('.owl')" >Owl</li> <li class="lion" onclick="moveToImage('.lion')" >Lion</li> <li class="bear" onclick="moveToImage('.bear')" >Bear</li> </ul> </div> <div class="forest" ></div> <div class="eagle" ></div> <div class="rhino" ></div> <div class="owl" ></div> <div class="lion" ></div> <div class="bear" ></div> <div class="back" ></div> </div></body> |
Trong phần này, bố cục không khác so với bài học trước. Chúng ta hãy xem lại cách chia các phần một lần nữa.
2. Phần CSS
Trước hết hãy xem qua toàn bộ mã nguồn:
|
1
2
3
4
5
6
7
8
9
10
11
12
13
14
15
16
17
18
19
20
21
22
23
24
25
26
27
28
29
30
31
32
33
34
35
36
37
38
39
40
41
42
43
44
45
46
47
48
49
50
51
52
53
54
55
56
57
58
59
60
61
62
63
64
65
66
67
68
69
70
71
72
73
74
75
76
77
78
79
80
81
82
83
84
|
html, body, div { height: 100%;}.parallax { position: relative;}.parallax > div { background-attachment: fixed; background-position: center; background-repeat: no-repeat; background-size: cover; height: 100%; display: flex; justify-content: flex-end; align-items: center; position: relative;}div.forest { background-image: url("<a href="https://freetuts.net/upload/tut_post/images/2019/03/16/1679/forest.jpg">https://freetuts.net/upload/tut_post/images/2019/03/16/1679/forest.jpg</a>");}div.eagle { background-image: url("<a href="https://freetuts.net/upload/tut_post/images/2019/03/16/1679/eagle.jpg">https://freetuts.net/upload/tut_post/images/2019/03/16/1679/eagle.jpg</a>");}div.rhino { background-image: url("<a href="https://freetuts.net/upload/tut_post/images/2019/03/16/1679/rhino.jpg">https://freetuts.net/upload/tut_post/images/2019/03/16/1679/rhino.jpg</a>");}div.owl { background-image: url("<a href="https://freetuts.net/upload/tut_post/images/2019/03/16/1679/owl.jpg">https://freetuts.net/upload/tut_post/images/2019/03/16/1679/owl.jpg</a>");}div.lion { background-image: url("<a href="https://freetuts.net/upload/tut_post/images/2019/03/16/1679/lion.jpg">https://freetuts.net/upload/tut_post/images/2019/03/16/1679/lion.jpg</a>");}div.bear { background-image: url("<a href="https://freetuts.net/upload/tut_post/images/2019/03/16/1679/bear.jpg">https://freetuts.net/upload/tut_post/images/2019/03/16/1679/bear.jpg</a>");}div.back { background-image: url("<a href="https://freetuts.net/upload/tut_post/images/2019/03/16/1679/back.jpg">https://freetuts.net/upload/tut_post/images/2019/03/16/1679/back.jpg</a>");}.parallax > div.side-menu { position: fixed; top: 30%; left: 10px; background-color: transparent; opacity: 0.5; height: fit-content; height: -moz-fit-content; color: white; font-size: 20px; font-weight: 800; mix-blend-mode: difference; z-index: 99;}div.side-menu ul { padding: 0 10px; list-style: none;}div.side-menu ul li { margin: 20px; width: 100px; padding-bottom: 5px; transition: 1s ease; border-bottom: 2px solid white; box-sizing: border-box;}.active { padding-left: 50px;}div.side-menu ul li:hover { cursor: pointer; padding-left: 50px;} |
Phần này ta tạo thêm class active, class này sẽ được chèn vào từng thẻ likhi người dùng cuộn xuống đúng vị trí của ảnh nền.
3. Phần JavaScript
Trước hết hãy xem qua toàn bộ mã nguồn:
|
1
2
3
4
5
6
7
8
9
10
11
12
13
14
15
16
17
18
19
20
21
22
23
24
25
26
27
28
29
30
31
32
33
34
35
36
37
38
39
40
41
42
43
44
45
46
47
48
49
50
51
52
53
|
$(document).ready(function () { //$("html, body").animate({scrollTop: $(document).height()}, 50000); $("ul li").click(function () { setTimeout(function () { }, 300); }); $(window).scroll(function() { $("li").removeClass("active"); if(Math.abs($(window).scrollTop() - $("div.forest").offset().top) < $(window).height()/2) { if($("audio").attr("src") != ".forest.mp3") { $("audio").attr("src", ".forest.mp3"); } $("li.forest").addClass("active"); } else if(Math.abs($(window).scrollTop() - $("div.eagle").offset().top) < $(window).height()/2) { if($("audio").attr("src") != ".eagle.mp3") { $("audio").attr("src", ".eagle.mp3"); } $("li.eagle").addClass("active"); } else if(Math.abs($(window).scrollTop() - $("div.rhino").offset().top) < $(window).height()/2) { if($("audio").attr("src") != ".rhino.mp3") { $("audio").attr("src", ".rhino.mp3"); } $("li.rhino").addClass("active"); } else if(Math.abs($(window).scrollTop() - $("div.owl").offset().top) < $(window).height()/2) { if($("audio").attr("src") != ".owl.mp3") { $("audio").attr("src", ".owl.mp3"); } $("li.owl").addClass("active"); } else if(Math.abs($(window).scrollTop() - $("div.lion").offset().top) < $(window).height()/2) { if($("audio").attr("src") != ".lion.mp3") { $("audio").attr("src", ".lion.mp3"); } $("li.lion").addClass("active"); } else if(Math.abs($(window).scrollTop() - $("div.bear").offset().top) < $(window).height()/2) { if($("audio").attr("src") != ".bear.mp3") { $("audio").attr("src", ".bear.mp3"); } $("li.bear").addClass("active"); } else if(Math.abs($(window).scrollTop() - $("div.back").offset().top) < $(window).height()/2) { if($("audio").attr("src") != ".back.mp3") { $("audio").attr("src", ".back.mp3"); } $("li.back").addClass("active"); } });}); |
Chúng ta sẽ dùng thư viện jQuery để hỗ trợ cho việc viết script, để tích hợp jQuery vào mã nguồn chúng ta làm như sau:
Bước 1: vào trang https://code.jquery.com/
Bước 2: chọn phiên bản jQuery mới nhất, ở đây ta cho jQuery 3.x.
Bước 3: jQuery cung cấp rất nhiều gói khác nhau, để web xử lý nhanh gọn và hiệu quả ta chọn gói minified.
Bước 4: khi chọn minified thì một popup sẽ hiện ra, sau đó sao chép đoạn mã.
Bước 5: dán đoạn mã đã sao chép vào thẻ head
|
1
2
3
4
5
|
<script src="<a href="https://code.jquery.com/jquery-3.3.1.min.js">https://code.jquery.com/jquery-3.3.1.min.js</a>" integrity="sha256-FgpCb/KJQlLNfOu91ta32o/NMZxltwRo8QtmkMRdAu8=" crossorigin="anonymous"></script> |
Bây giờ chúng ta bắt đầu tìm hiểu đoạn script:
Bước 1: xóa các class activeđã tồn tại trước đó trong thẻ li.
|
1
|
$("li").removeClass("active"); |
Mục đích của thao tác này là khi thanh cuộn di chuyển đến một vị trí mới thì, hiệu ứng ở vị trí cũ của thẻ lisẽ được loại bỏ.
Bước 2: thêm câu lệnh điều kiện
|
1
2
3
4
5
6
7
8
9
10
11
12
13
14
15
16
17
18
19
20
21
22
23
24
25
26
27
28
29
30
31
32
33
34
35
36
37
38
39
40
41
42
|
if(Math.abs($(window).scrollTop() - $("div.forest").offset().top) < $(window).height()/2) { if($("audio").attr("src") != ".forest.mp3") { $("audio").attr("src", ".forest.mp3"); } $("li.forest").addClass("active"); } else if(Math.abs($(window).scrollTop() - $("div.eagle").offset().top) < $(window).height()/2) { if($("audio").attr("src") != ".eagle.mp3") { $("audio").attr("src", ".eagle.mp3"); } $("li.eagle").addClass("active"); } else if(Math.abs($(window).scrollTop() - $("div.rhino").offset().top) < $(window).height()/2) { if($("audio").attr("src") != ".rhino.mp3") { $("audio").attr("src", ".rhino.mp3"); } $("li.rhino").addClass("active"); } else if(Math.abs($(window).scrollTop() - $("div.owl").offset().top) < $(window).height()/2) { if($("audio").attr("src") != ".owl.mp3") { $("audio").attr("src", ".owl.mp3"); } $("li.owl").addClass("active"); } else if(Math.abs($(window).scrollTop() - $("div.lion").offset().top) < $(window).height()/2) { if($("audio").attr("src") != ".lion.mp3") { $("audio").attr("src", ".lion.mp3"); } $("li.lion").addClass("active"); } else if(Math.abs($(window).scrollTop() - $("div.bear").offset().top) < $(window).height()/2) { if($("audio").attr("src") != ".bear.mp3") { $("audio").attr("src", ".bear.mp3"); } $("li.bear").addClass("active"); } else if(Math.abs($(window).scrollTop() - $("div.back").offset().top) < $(window).height()/2) { if($("audio").attr("src") != ".back.mp3") { $("audio").attr("src", ".back.mp3"); } $("li.back").addClass("active"); } |
Chúng ta có bao nhiêu ảnh nền thì có bấy nhiêu điều kiện được thiết lập.
Bước 3: điều kiện cho từng thẻ li
|
1
|
Math.abs($(window).scrollTop() - $(elem).offset().top) < $(window).height()/2 |
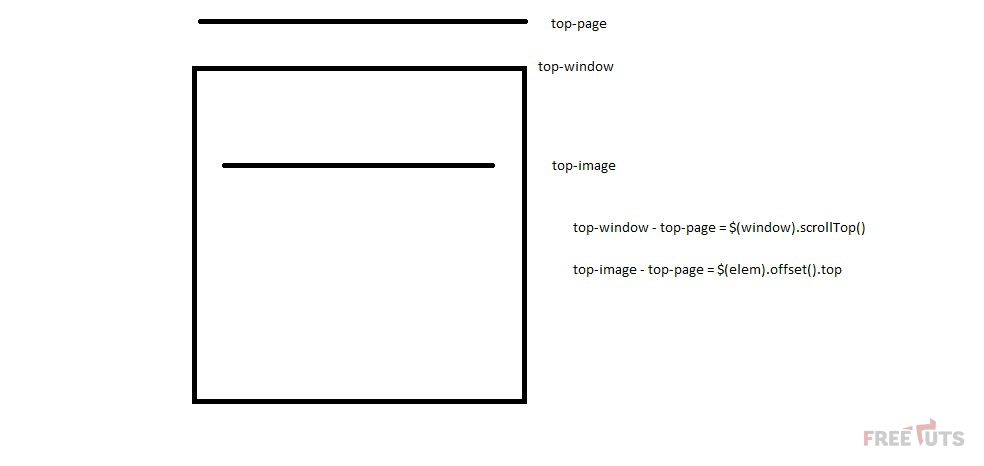
Việc giải thích cho điều kiện này cũng khá đơn giản. Như trên, ta có thể hiểu là trị tuyệt đối của hiệu giữa khoảng cách của thẻ liđến đầu trang và khoảng cách của đỉnh góc nhìn hiện tại đến đầu trang phải nhỏ hơn phân nửa chiều cao của khung hình trên trình duyệt. Điều này có nghĩa là khi cuộn màn hình và ảnh xuất hiện quá nửa chiều cao của cửa sổ thì hiệu ứng sẽ được thiết lập. Xem hình bên dưới:
Việc còn lại là chỉ cần thêm vào class activecho thẻ likhớp với câu lệnh điều kiện.
|
1
|
$("li").addClass("active"); |
Theo:https://freetuts.net
ĐĂNG KÝ THÀNH VIÊN

NẾU NỘI DUNG HỮU ÍCH HÃY XEM QUẢNG CÁO ĐỂ ỦNG HỘ

NẾU NỘI DUNG HỮU ÍCH HÃY XEM QUẢNG CÁO ĐỂ ỦNG HỘ

Phần mềm


Được quan tâm nhiều nhất


-
iPhone 11 Pro Max Teardown - Tiny Motherboard & BIG Battery!
-
Apple Watch Series 5 Teardown - Always on Display Explained
-
Apple Watch Series 4 Teardown
-
Phim Ngắn Đột Kích - Phiên bản 10 năm trước